

How To Register An Iphone On Itunes
We love when everything is done with few easy steps, and since a lot of our blog readers own their mobile apps, we thought it would be a good idea to write down a clear guide on how to register an account on iTunes and submit an app to the App Store.
Part 1
Account Registration
In order to submit applications to the Store, you will have to have a developer's account.
NOTE: In order to register as a developer, you will have to pay a $99 fee.
Steps for account registration:
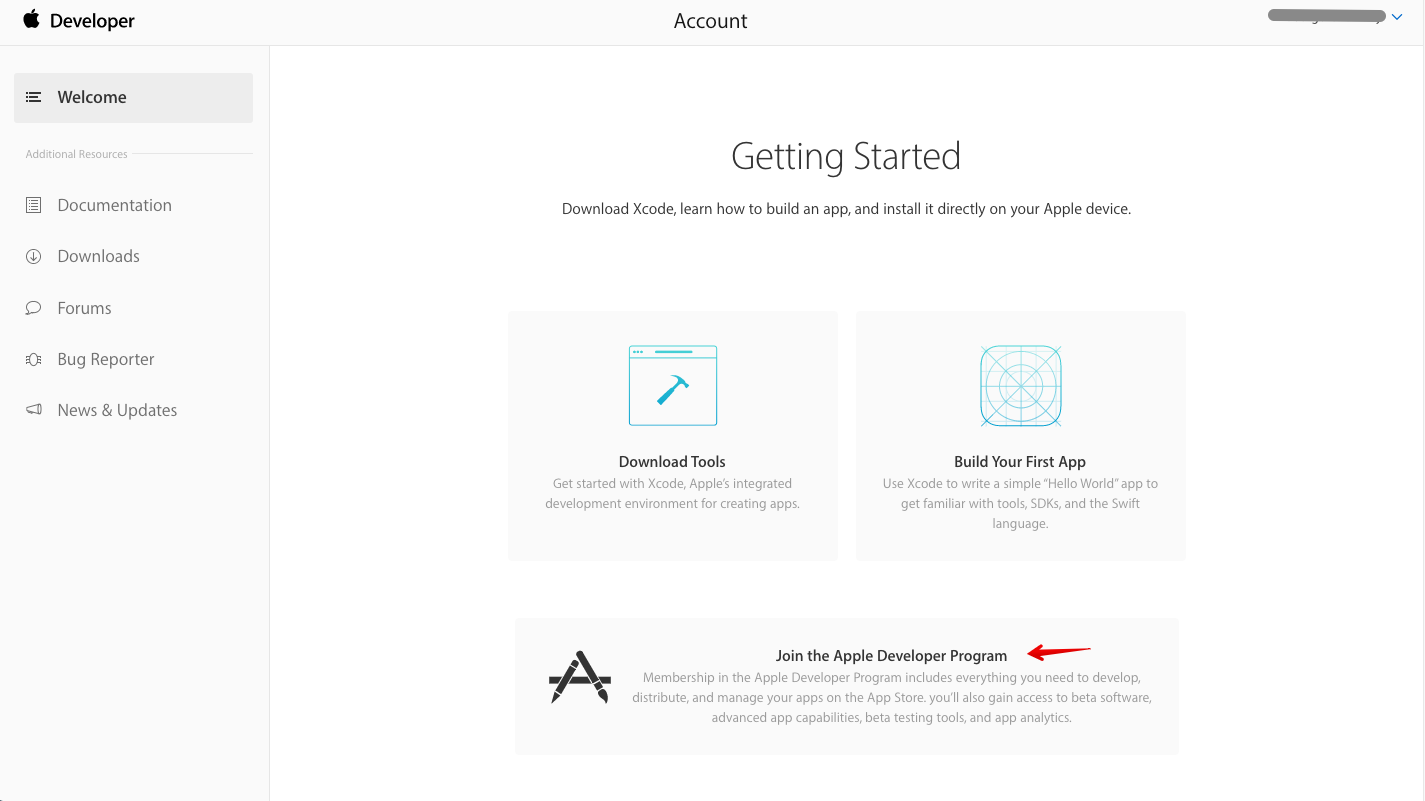
- Go to the Apple Developer Site
- Click on "Account" in upper right corner
- Create Apple ID or use your existing one
- Fill in all the required information in case you are creating a new ID and verify your email address

Success! Now log in.
After you log into your developer account, you will have a lot to read – the legal agreement, of course. Spend some time together with your lawyer to really go through all the text, because it's something to do with your business and you don't want to skip any important points.
As soon as you are done with that and received approval from the lawyer, click on submit and you are ready to go!
Speaking about the fee mentioned above, it is a fee for joining Apple's Developer Program. Without investing some money, you will not have access to all the info, libraries and tools so this is something that has to be done. These are the necessary steps:
- After you log in (as in the steps above), you will see "Join the Apple Developer Program" at the bottom of the page, click on the link.
- Then click on "Enroll" on the right side.

Now there' s a tricky part. You can choose whether to enroll as an individual or the company and we'd recommend you choose the "individual" option because it will save your time and requires less paperwork. However, if you are a medium or big-sized company, obviously choose "company" option.
- After you check either "individual" or "company," click on "Start the enrollment"
- Select your type of business and click "Continue"
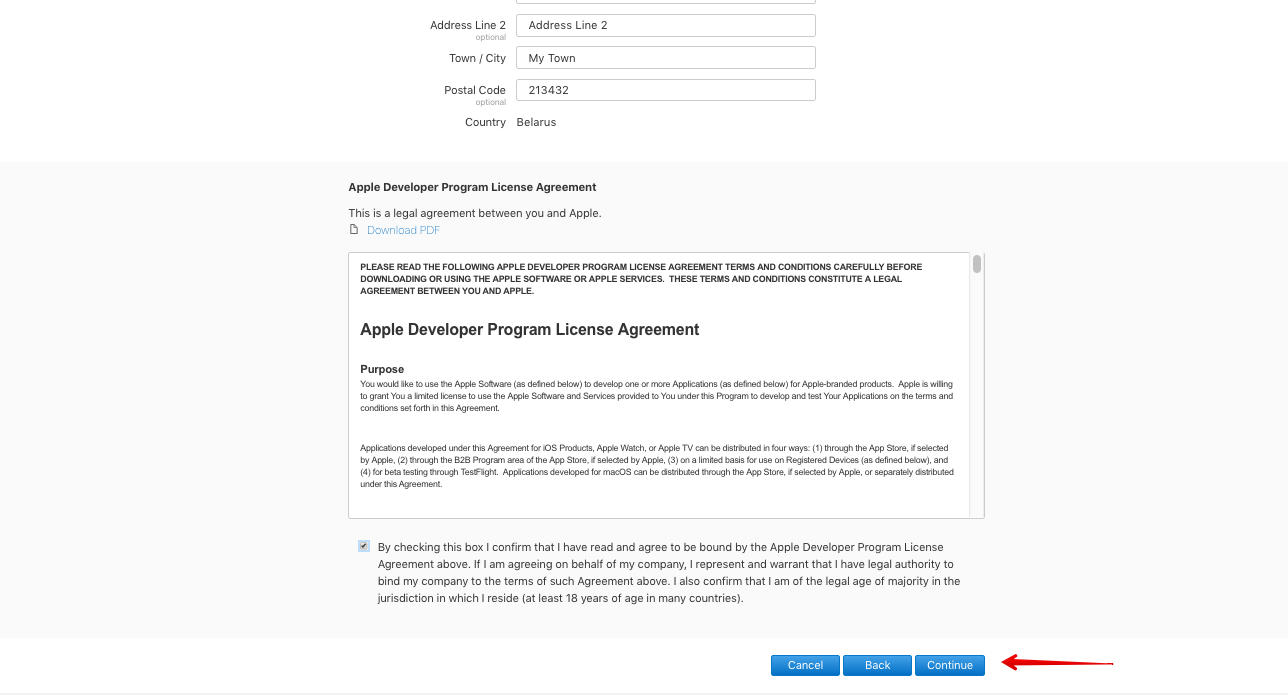
- Enter all the required information
- Once again read the agreement with your lawyer, receive approval, tick the box "I agree" and click "Continue"
- Review all the information once again and click on "Continue"

Now you will be offered an option for automatic renewal of your membership, meaning your apps will always stay available and you will be able to access all membership benefits any time. The option is quite convenient but it's up to you whether to choose it or not.
- After deciding on the automatic renewal option, click "Continue"
- Log in again
- Fill in the billing information
- Click "Purchase"
After all these steps you will receive emails with confirmation about you joining the Developer Program. Now follow the links, log in and voila – you made it!
There is a lot of information in the Developer Center, including all kinds of tutorials, documentation, videos, etc. You will mostly be focusing on Certificates, IDs & Profiles and iTunes Connect while working on your apps.
Part 2
Things to Do Before App Submission
By now you must be familiar with Apple Development Center and you should know the importance of the Certificates, IDs & Profiles area. In order for the app to be approved by Apple and run on iOS devices, it has to have a signed Apple Certificate. In case there is no signature or it's not valid, the app will not run, so in order to make your apps work, you need to go to Certificates, IDs & Profiles and generate profiles. They are generated by Development Center and will allow Xcode to sign your applications. There are two types of profiles:
- Development: such profiles are linked to specific devices only so you will use them to check the app on your own device.
- Distribution: these ones are used for signing your app before submitting it to Apple.
And here are the steps for certificate creation:
- If you are on Development Center page, click either on Certificates, IDs & Profiles on the left or on the gear icon in the middle of the screen
- Once you are there, check that the drop down in the left upper corner says iOS, tvOS, watchOS
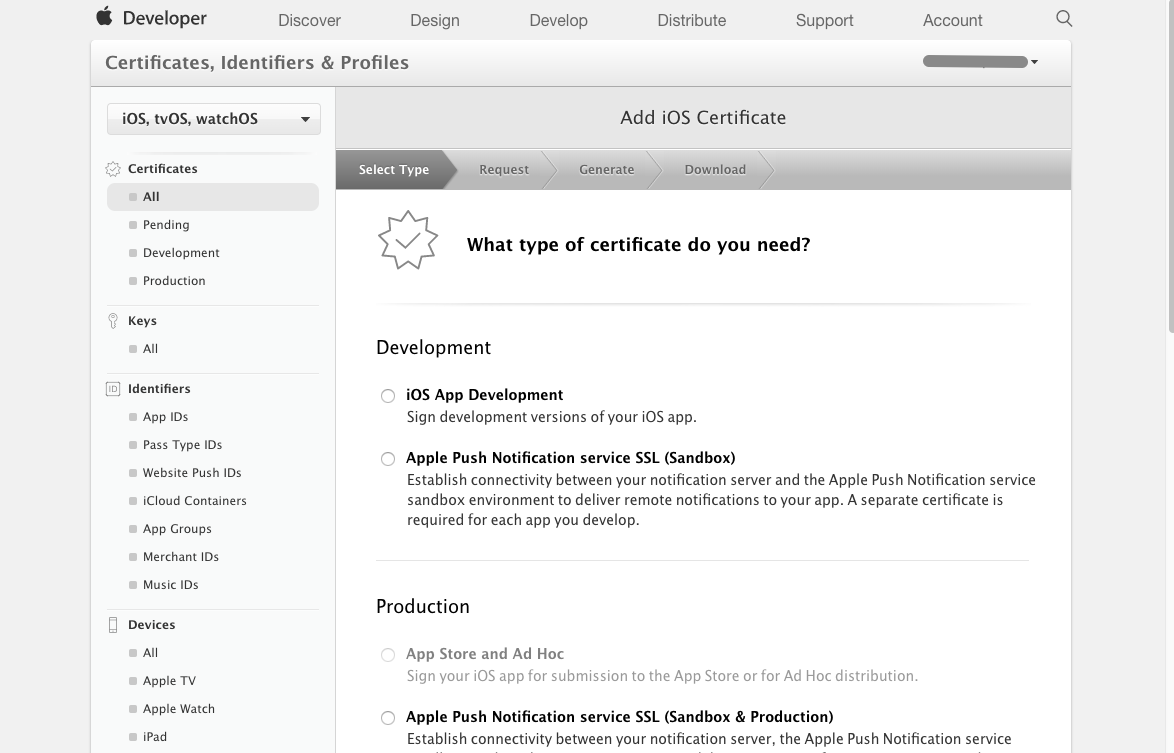
- Click on "+" in the upper right
- You will be directed to "Add iOS Certificate page". Select "iOS App Development" and click on "continue"
- Then you'll see how to generate CSR by Keychain Access. In order to do so, open the Keychain Access app on your Mac.
- After it opens, click on Keychain Access - Certificate Assistant - Request a Certificate From a Certificate Authority
- A "Certificate Assistant" window will open
- In this window, fill in your email and name, tick "save to disk" and "continue"
- Save the file on your Mac
- You created CSR and now you have to generate this certificate. For that:
- Go back to Development Center, click "Continue"
- Click on "Choose file," select the saved file and click "Continue"
You will see a screen saying that certificate is ready. Download it and then double click on development certificate file in order to install it into the keychain. A Keychain Access dialog will appear, click on "Add" in this window and installation will be completed.

After completing all these steps, you got your certificate for development profiles but you also need one for the distribution ones. Here are the things you need to do:
- Click on "Add another."
- In the Production area, choose App Store and Ad Hoc, click "Continue."
The process will be similar to the one described above and you will receive a certificate. After that, download it and double click again for its installation.
Now if you look in Keychain Access you will see your certificates both installed.
After all this tiresome work, it's time to register your device. While being in the Certificates, IDs & Profiles area again, click on Devices – All (on the left side) and then click on "+" on the right. Then:
- Open iTunes and plug your device into your Mac.
- Select your device.
- When iTunes displays the info about your device, click on the serial number and it will change to UDID of your device, you will need to copy it.
- Go back to device registration, enter the name of the device and paste the UDID. Click "continue" once you are done.
- After that, click "Register."
But that's not all! Now you need an App ID. In the Certificates, IDs & Profiles menu click on Identifiers\App IDs and click on "+" on the right. Fill in all the required info and don't forget to tick "Explicit App ID", after that enter the Bundle ID. Then click "Continue – Register" and that's the time when you can get down to creating distribution and provisioning profiles.

- From the same menu as before, click on Provisioning Profiles\All and on "+".
- Tick "iOS App Development" and "Continue."
- Select an App ID for the profile. You will have only one by now.
- Select certificate.
- Select your device.
- Enter a descriptive name for this new profile.
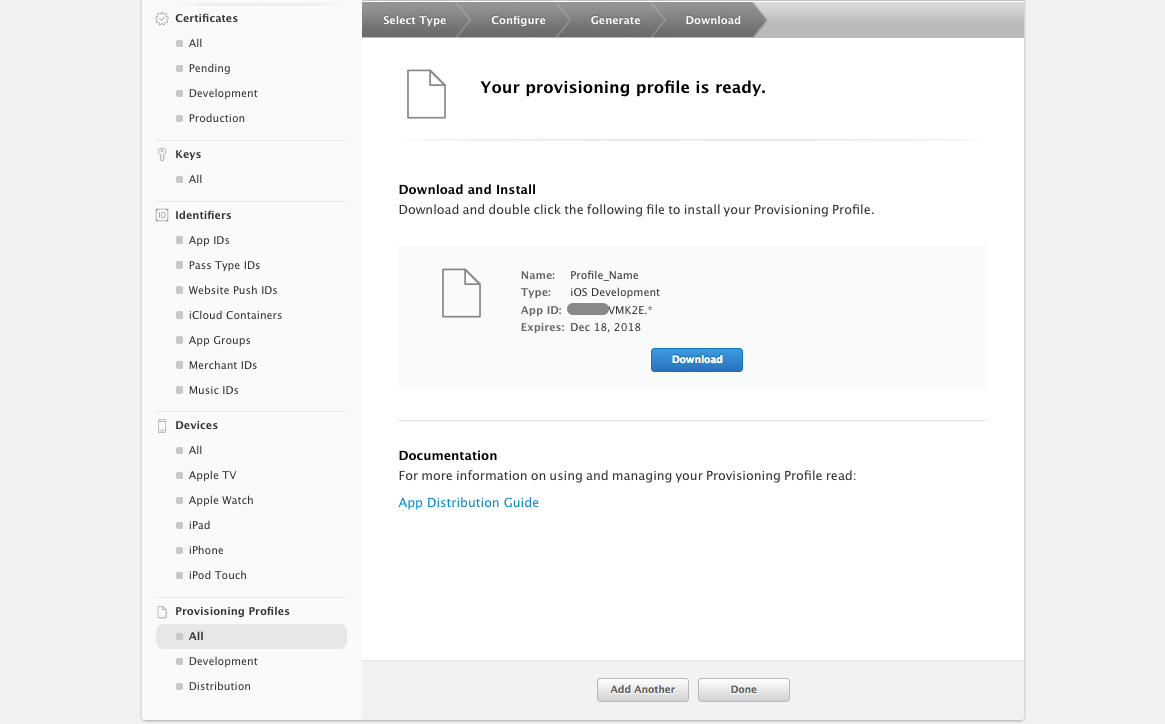
- Download the profile.
- Click on "Add another." It will save your time because on this same page it's possible to create a distribution profile, too.
- Choose the "App Store" option.
- Follow the same steps until you download the profile.
Now everything is ready for submitting your application!
Part 3
How to Run Your App on Your iOS Device
Obviously, you need an app in order to perform all the steps that we are going to describe. However, there are a lot of apps that you can download for free and test in case yours is not ready yet. And here is what you now have to do:
- Open the project in Xcode.
- Open the project navigator.
- Click on the node of the tree on the left.
- Click on the target (DropCharge).
- Click on "General."
- Set Deployment Target (bottom middle) to 9.0.

Deployment target means the minimum iOS version that your app will support, simple as that. Keep in mind that if you set your app to iOS 8.0 and the used API would be available on 9.0 only, the app will crash.
The next steps are:
- Change bundle identifier (same as for Apple ID).
- Assign your team by selecting the necessary account.
- Click on Build Settings and enter "signing" in the search field.
In the search results, you will see "Code Signing Identity" section, click on the drop-down for "debug" and "release" entries and choose your provisioning profiles. Select your developer profile for Debug and your distribution profile for Release.
- Ensure your device is connected to Mac.
- Choose to build for this device.
- Press ⌘B to start building.
- Press ⌘R.
- See the app running on the device!
Now let's see how to actually submit your application to the App Store. First, go to the Member Center of the Apple Developer website and use your credentials for login, then click on the iTunes Connect. You will be offered an introduction and you can skip it if you wish. Make sure to accept the Terms of Service. Welcome to the dashboard!
In case you want to get money for your app, click on "Agreements, Tax and Banking", then choose "Request" (upper right) and perform all necessary steps with the help of your lawyer. You will have to fill in contact, bank and tax information. Now let's move on.
- Go back to the dashboard
- Click on "My Apps"
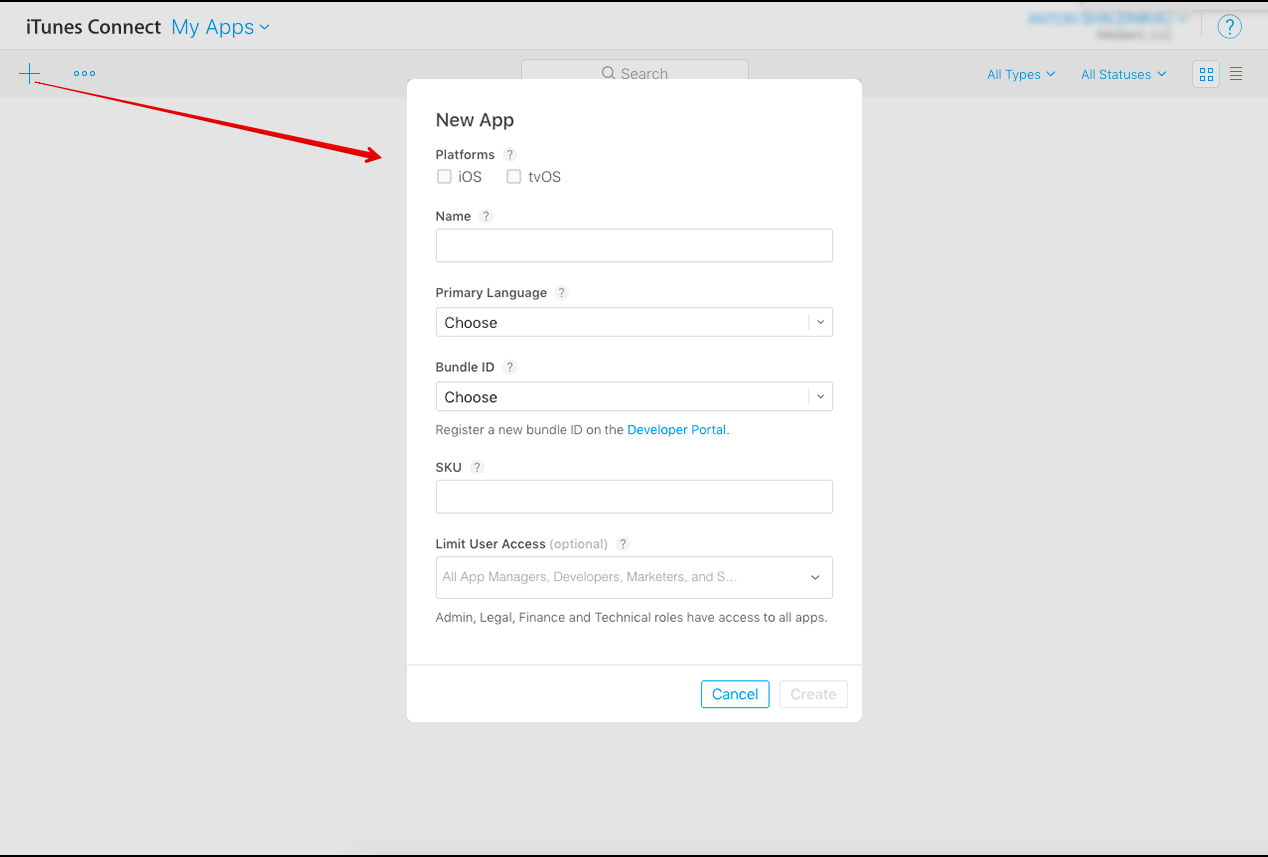
- Click on "+" in the upper left corner and choose "New App"
Fill in the necessary info: choose iOS, fill in the app's name, select primary language, select correct bundle ID, create SKU. And click on "create!" Then on details screen click on "App information" and fill it in.
Then go to "Pricing and Currencies" and either choose your price or select that the app would be free. You can also select your pricing schedule there in case you want to go with a paid app.
Finally, click "1.0 Prepare for submission."
- Add screenshots and an icon. In case your app is universal, make sure you submit screenshots for both iPhone and iPad.
- Complete the description for your app.
- Enter the keywords and don't underestimate their importance.
- Enter URL for website support page.
- Scroll down to "General App Information" (skipping "Build").
- Add the icon.
- Set the version number.
- Fill in the info in the copyright notice.
- Next to "rating," you will see "edit section." Fill it out and be honest! The reviewer can change it if they disagree.
- Then scroll to "App Review Information." Here, in "Notes," you can write anything you want a reviewer to know about. In other words, you can make reviewer's job easier by providing all necessary links, credentials, and info that can help faster and better assess your app.
- Then you can go to the "Version Release" section to choose when you want your app to be released. But if it's your first submission, just leave the option of automatic release and click "save". And now click "submit for review!" In case of a message saying there are errors, it may simply mean the app is not uploaded yet so no worries.
However, you also need to submit an app via Xcode. For that:
- Go to Xcode, and in the upper section, choose Generic iOS Device.
- Then select Product/Archive.
- Click "Upload to App Store."
- Select your credentials, click on "choose."
- You will see the app to upload so click "upload."
After you see the successful upload window, click "done."
- Go back to iTunes and go to Build section that you skipped.
- Click on "Select a build before you submit your app."
- Select the build and click "done."
- Click "Save – Submit for review – Submit."
Now, wait for your app to be approved! You can check its status in iTunes by clicking on "Activity" on the left.
Topics:
ios, itunes, mobile, mobile app development, tutorial
Opinions expressed by DZone contributors are their own.
How To Register An Iphone On Itunes
Source: https://dzone.com/articles/how-to-register-account-in-itunes-and-submit-an-ap
Posted by: pattondesten.blogspot.com
0 Response to "How To Register An Iphone On Itunes"
Post a Comment